
Anyone can set up a blog.
Anyone can write a blog.
But writing a perfect blog article that is read, commented on, and shared is a somewhat higher art.
I don’t want to present myself as a guru now. But I think I developed a working step-by-step guide that will help me write damn good blog articles.
Would you like to write perfect blog articles now too? Well, then let’s go!
Here is your (and mine) step-by-step guide:
Step 1 – Develop a powerful headline
The headline, the headline, or the title. No matter what you call the part – the headline is the most important thing.
In our world today, we’re just so littered with advertising. It is therefore important that your headline stands out from the crowd and attracts attention.
The headline is so important because this is the first thing you see. For example, you can see this in:
- Google (the blue headings)
- Facebook (the bold text)
- Twitter (the default tweet)
- Emails (as subject)
- Backlinks (mostly in the anchor text)
Brian Clark and I think that we should start with the headline. A headline is a promise to your reader. It’s a lot easier if you first make a promise (your headline) and then fulfill it (your text).
With the help of the headline, you also determine the topic you want to write about. I use a list of lots of article ideas in Notes for this.
If you want to write an attention-grabbing headline, make sure that it fulfills the following 4 characteristics:
- Useful
- Urgent
- Unique
- Ultra-specific
For this article, I took my actual article idea from my Notes and came up with some headings.
More precisely, I came up with the following ideas:
- How to Write the Perfect Blog Article
- How to write the perfect blog article step by step
- The ultimate step by step guide for the perfect blog article
- How to Write the Perfect Blog Article (The Ultimate Step-by-Step Guide)
I found the last one the best and that’s why I chose it.
So first of all, brainstorm a headline for your blog post. Then you can start the actual research.
Step 2 – Research the current blog landscape
You can not know everything. And that’s OK too. That’s what the research is for! 🙂
If you follow an article in the Wall Street Journal, we are now recording more online within a few hours than our ancestors did in their entire lives – then let’s make use of this gift!
And in order to dig deeper into the subject, not to forget any details, and generally to find reliable sources for your claims, extensive research is simply necessary.
In order to research correctly, quickly, and easily, you should use the following 6 steps:
- Feed Google different search terms
- Look at the first 100 search results
- Open related pages, magazines, and blogs
- Scan the tens of thousands of websites
- Filter out non-high-quality and dubious sources
- Read and familiarize yourself with the topic
For this article, I entered terms like write a blog article or how to write a blog post.
Leave the pages open all the time while you are writing the article, you can always look at it if you have forgotten something or if you are missing more detailed information.
If you like, you can take notes on a piece of paper or directly in your text editor while you research. I use Writemonkey as a writing program – it protects against distraction and is free.
Oh, and also save the URLs in your text document, you will need them later! 😉
Step 3 – Don’t forget to do keyword research
That’s right, you can do your own keyword research.
Of course, you write blog articles for people, and not just for search engines, right? If not, then maybe you should change that.
But your blog post must still please the search engine. So you need to tweak your article a bit.
And how do you optimize your text for the search engine? Mainly with keywords. The search engine will find your blog post attractive and you will be found for certain terms.
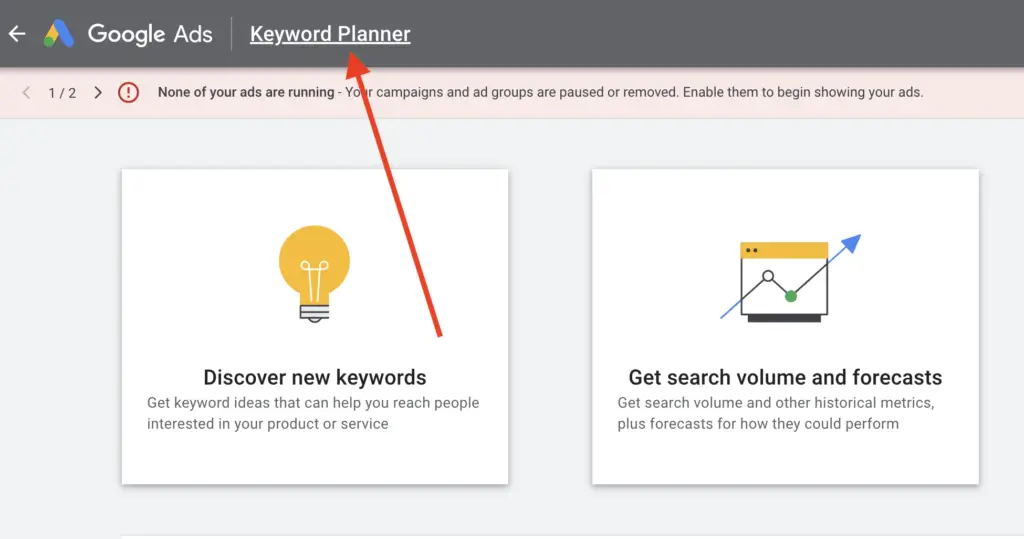
I use the free Google Ads – Keyword Planner for this. Of course, the best keywords are those that have little competition but a lot of search queries with competition marked as “low”.
Please note, however, that these are only guidelines (this only refers to the competition in Google AdWords).
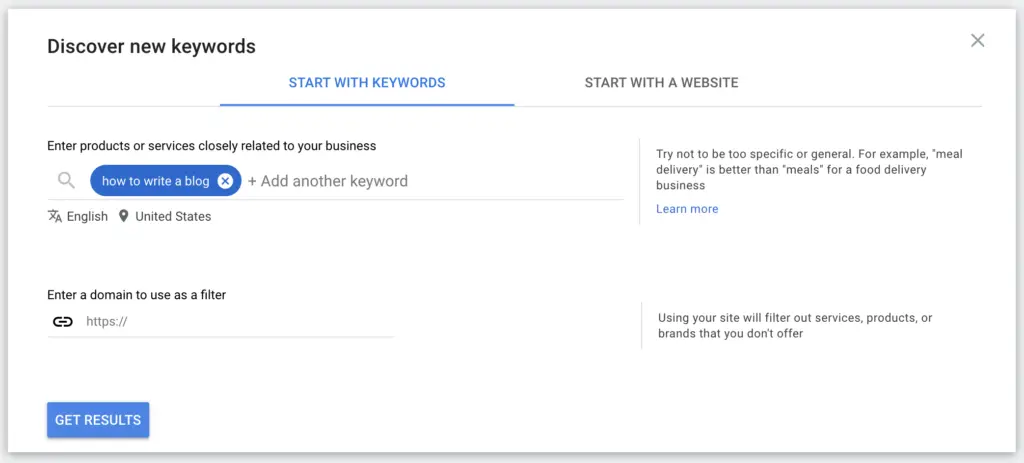
To find this precious tool, you need to have a Google Ads account first. From there, go to Keyword Planner and choose Discover new keywords option.
Enter the keyword you want to research and the location (optionally):
What do we see?
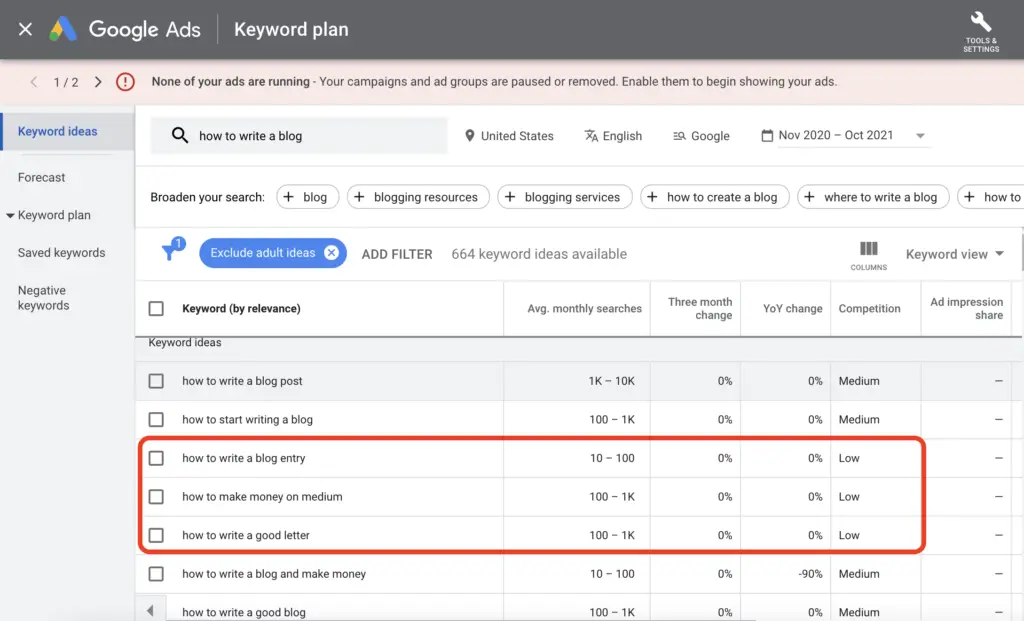
Little competition, that’s a good thing for topics such as “How to make money on Medium”.
Nevertheless, I decided to use the term “blog article writing”. My audience is interested in this topic and my articles are generally shared on social networks. So let’s hope for the best!
As soon as you have your main and a few secondary keywords, you should incorporate them into your headline, sub-headings, and the body of the blog article.
But always remember, do it naturally. Not too artificial, or your readers will sense it.
Step 4 – Let your mind wander
So, in this step, you just write down everything you have learned from research and what else you know about the topic. Do not pay attention to the structure, the spelling or other small details.
The main thing is that you get your thoughts on paper (yes yes, I know, in digital form I mean).
This is where you draw the true power of Google Docs.
Then I just start typing and write, for example, the following things in a wild jumble:
- Everything I know about this
- Everything I’ve ever heard on the subject
- Introduction ideas
- Ideas for the final part
- Structure ideas
- Other word-like letter strings
I keep doing that until I have no more thoughts about it.
You may find this brainstorming too chaotic, but it really helps you get the ball rolling and overcome the dangerous mental block.
Step 5 – Create your structure
Now that you have a rough first draft, you should create a structure. And what is the best way to do it? With subheadings, of course.
In this article, for example, there is a total of 16 sub-headings.
If you use a number in the heading, this ensures clarity and better understanding.
Let me illustrate this again with an example. For example, if your article reads “5 bananas you should have eaten,” then your subheadings should say:
- apple banana
- plantain, etc.
Just play around and use the term step (as in this article), simple numbers, the # sign, or something else creative.
Oh, and don’t forget a short summary or your conclusion.
Step 6 – Fill in the gaps
If you have the structure, then you can easily and conveniently fill in the gaps. Again, you will overcome the writer’s block and writing will certainly be easier for you.
It’s just like filling out a form – and you can get along with it (at least most of the time) quite well.
Again, don’t pay attention to perfection or spelling, just write wildly and fill in the gaps.
Don’t forget to put the things from step 4 in the gaps.
In this step, you can always refer to the sources from the research and find out again or get inspired.
Personally, I like to go from top to bottom here, so I just force myself to fill in everything and not hop back and forth like a rabbit.
And if you want to use graphics or images, just put a placeholder. I use * image * for this.
Step 7 – Fine-tune your blog article
So, now you have your topic, an awesome headline, a handful of keywords, a structure, and rough text – just a big, flawed blank.
Since the article doesn’t feel so nice and round yet, you have to sand it down a bit.
Read it out loud (preferably from top to bottom), see what could be improved and what sounds better.
Questions that you could ask yourself would be e.g .:
- Do the sentences sound correct?
- Are the sentences grammatically correct?
- Do the paragraphs make sense?
- Can I delete unnecessary things?
And, most importantly, always remember, blogging is like speaking freely with someone sitting right in front of you. So don’t write a well-founded factual article, but rather have an open, free conversation.
Keep asking questions to involve your reader. Just be loosely flaky. Just be human.
Also, don’t forget that it’s best to write for one person (your perfect client) and that you spice up your article with plenty of examples, stories, and a bit of entertainment.
Step 8 – Fine-tune your blog article a little further
You should now have an almost finished item.
So give yourself a break. Most of the time I don’t continue until the next day. If you immerse yourself in a topic like this, at some point you will be blind and you can no longer see the forest for the trees.
That’s why a little distance usually gives you a new perspective and you notice things to improve that you didn’t notice before.
In this step, you should go through the entire article again, read it aloud, and finish it.
And, it’s also important that you end each article with a direct call to action. I always ask a question, it starts a conversation and I get more comments accordingly. And every blogger wants more comments, right?
And a blog is about entertainment, then communication.

Step 9 – Use relevant images
Now is the time for pictures!
Find suitable images that should support your text as you write a blog.
I often use recordings from websites, for this, I use the built-in Apple tool called for screenshots.
By pressing Control + Command + 4 in your current browser window, you can take a shot of a self-marked area or the entire page. You can then easily add arrows, circles, rectangles, and lines in specific colors.
This is much faster than with an image editing program such as Photoshop. The tool really saves you time.
Oh, and of course you need an article picture. To do this, you can search for free images on Pexels, Unsplash or use WordPress own stock image collection.
And to round off the topic of the article image again, the image should have the file name and the alt tag of your main keyword.
Step 10 – Check your spelling
We are slowly drawing to a close with this tutorial on how to write a blog.
In step 10 you should check your article for the correct spelling. For this, Grammarly is invaluable – and it’s free!
Step 11 – Format your text
Of course, you still have to format your text.
In this step, in addition to the correct paragraphs, you should also add bold and italic words.
A paragraph should ideally only reflect one idea. Be free with paragraphs. The airier the text appears, the more pleasant it is to read (of course only up to a certain limit).
You should highlight important things in bold so that you can see a rough connection when you skim through the blog post (visitors always scan your text first).
Step 12 – Add links to your article
After you have a finished, nicely formatted text, you have to insert it into WordPress.
When the post has been inserted, you can start to set the links. You have saved all the URLs in your text document and use them conveniently.
Step 13 – Check the final work in WordPress
Your article is almost ready to be published and see the light of day.
However, you still have to do four little things in WordPress:
- Choose a suitable category for your article
- Choose keywords (keywords as described above) for your article
- Choose a suitable article image (as described above)
- Upload the appropriate images (as described above) and insert them
Step 14 – The final overview
At this step, you are almost done writing your blog.
But quality control should still follow.
Click on the “Preview” button and take a look at the article.
Is the headline good and appropriate? Does the permalink look OK? Are the pictures suitable? Is the formatting OK? Are there no spelling mistakes? Does the article read smoothly? Are the links working? Is there a call to action at the end? Is the overall picture just right?
If you can answer “yes” to all of the questions above, then you are broad. Ready to press the “Publish” button?
And the article is published! It can be read and shared.
The world is happy.
Conclusion
I hope I was able to provide you with step-by-step instructions on how to write a blog that really go into the smallest detail. I take exactly the same steps over and over again.
Maybe you find the effort too extensive. Some people would spend up to 10 hours on a post. But when you write high quality content, you will be rewarded with a lot of visitors.
You may also find the many fine-tuning and control steps time-consuming. But that’s important so that you can just guarantee really good quality.
And the world needs better quality blog articles.
It’s my turn to ask questions. How do you write blog articles?